Hello,
This is my coup de grâce into coding snippets, which completes this mini-series (for now, at least). I wanted to do a tiny bit more Python, so began investigating which IDE to look into next:
Stackoverflow – Which Python IDE
Best Python IDE
The Eric IDE project caught my eye initially, and definitely looks like an incredibly interesting prospect. However, I find myself inexorably drawn to try out Sublime Text 3, only because I seem to have crossed paths with a fair few people using it. If anyone is interested in checking out the Eric IDE I’ve included a set of links below for further investigation:
Prerequisites
Eric IDE Prerequisites Listed
Python
PyQt
Downloads
For now, let’s focus our efforts on Sublime Text 3…
Sublime Text 3
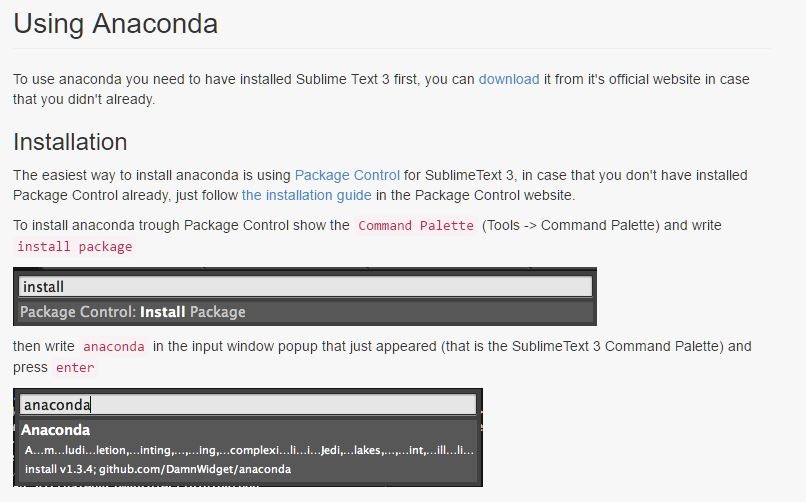
To get started, you can navigate to the Sublime Text 3 downloads page and grab the appropriate package for your OS. After reading up, there appears to be a project accessible on GitHub called Anaconda which ‘turns Sublime Text 3 into a full featured Python development IDE’. In order to utilise this functionality, you’ll first need (well, this is the easiest way from the options listed) Package Control, which is essentially a Package Manager for Sublime.
Here are a few basic notes for getting Anaconda setup with Sublime Text 3:
In addition, this blog post looks like a strong starting point for investigation into setting up Sublime Text 3 for Python development:
Just to prove the point, here is Anaconda showing its presence via a context menu in the IDE:

I’ve taken a few additional steps here. For starters, I wanted to run my code directly within Sublime, which requires configuring the correct Build System, as follows:

After performing the Build System configuration you can decide on whether you want to use syntax-only style checks or physically run your code on build (‘Tools > Build With‘):

So, as far as setup goes, that covers it. On to snippets…
Snippets in Sublime
To the main event, how do you create snippets in Sublime Text 3?
Creating the snippet itself couldn’t be simpler, just navigate to ‘Tools > Developer > New Snippet…’ and you’ll be presented with the following:

The idea behind creating a snippet is conceptually similar to how you would create them for use within Visual Studio. With the content element (again, we are dealing with an XML format) you’ll find a CDATA definition; snippet code goes between the square brackets. Placeholders can be defined within the code snippet using the $ symbol followed by an incremental number, starting at one (depending on how many placeholders you have of course). The tabTrigger element defines the shortcut that needs to be typed into the IDE code window to bring the snippet into scope. Additional metadata can also be provided to specify the scope of a certain code snippet (e.g. just Python) and a friendly, textual description (stored in the aptly named description element). It sticks pretty close to other snippet creation conventions I’ve seen elsewhere, it’s certainly a cinch to pick up. Here is my first stab at a completed snippet, with comments left in line for reference:
<snippet>
	<content><![CDATA[
def saySomething(name):
	print("$1", name)
]]></content>
	<!-- Optional: Set a tabTrigger to define how to trigger the snippet -->
	<tabTrigger>ss</tabTrigger>
	<!-- Optional: Set a scope to limit where the snippet will trigger -->
	<scope>source.python</scope>
    <description>Say Something Snippet</description>
</snippet>
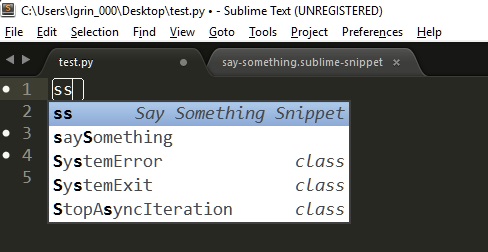
Snippet files are saved using the .sublime-snippet extension and for the purposes of a quick demonstration I’ve saved mine in the default location of ‘C drive > Users > MY_USER > AppData > Roaming > Sublime Text 3 > Packages > User’, this would require a bit more thought if you were creating more snippets (if you have organisational OCD such as I do). Initial reading does suggest that they should be saved under the ‘User’ directory regardless.
Within Sublime you will then need to save a file with a .py extension, ready to actually construct some Python code! The next two images show the newly created ‘say-something.sublime-snippet’ being brought into scope by keying in ‘ss’ and then hitting tab. As before, placeholders can be tabbed through for fast snippet completion:

Placeholder values, within snippets, can accept defaults by using the following convention:
<snippet>
	<content><![CDATA[
def saySomething(name):
	print("${1:Hello}", name)
	print (${2:5} + ${3:5})
]]></content>
	<!-- Optional: Set a tabTrigger to define how to trigger the snippet -->
	<tabTrigger>ss</tabTrigger>
	<!-- Optional: Set a scope to limit where the snippet will trigger -->
	<scope>source.python</scope>
    <description>Say Something Snippet</description>
</snippet>
That’s it, mini-series completed! As mentioned before I have a gargantuan mound of topics to cover, some just bubbling over in my mind and others sitting as draft posts ready for completion, so there is plenty of content on its way. Until the next time, have a great weekend!
