With the gradual piecing together of the Lego bricks forming the slow move over of the Frog & Pencil website to a more managed approach (building of a custom CMS and an all-around better ASP.NET MVC architecture) I thought it would be interesting to document the move over of Frog & Pencil images to a CDN. I was inspired to give this a go after watching Scott Hanselman make the switch for his podcast site images and other Azure Friday videos, as documented here:
Scott Hanselman lifting and shifting images over to a CDN.
Azure CDN with Akamai.
It seemed like a relatively painless process and is a step in the right direction for our site as a whole; so, let’s give it a go!
NOTE: A short way into this post I realised that I was making a few missteps. This is cool, I think, as I would rather document the journey I took with the mistakes listed, to be honest – #KeepingItReal! However, for sanity (mine and yours) I’ll specify the ‘correct’ order of events that you should follow here that you can marry up with the ramblings below:
- Sign in to the Azure Portal.
- Create a storage container, if you don’t already have one.
- Download and utilise a storage explorer application (such as Azure Storage Explorer).
- Create a CDN Profile and CDN endpoint (that ties explicitly to your storage container, in this instance).
- Go to your DNS settings and generate a CNAME property, mapping a custom domain to your CDN if you wish to.
- Optionally, learn how to programmatically interact with your storage container.
Azure Portal – First Steps (documenting the journey)
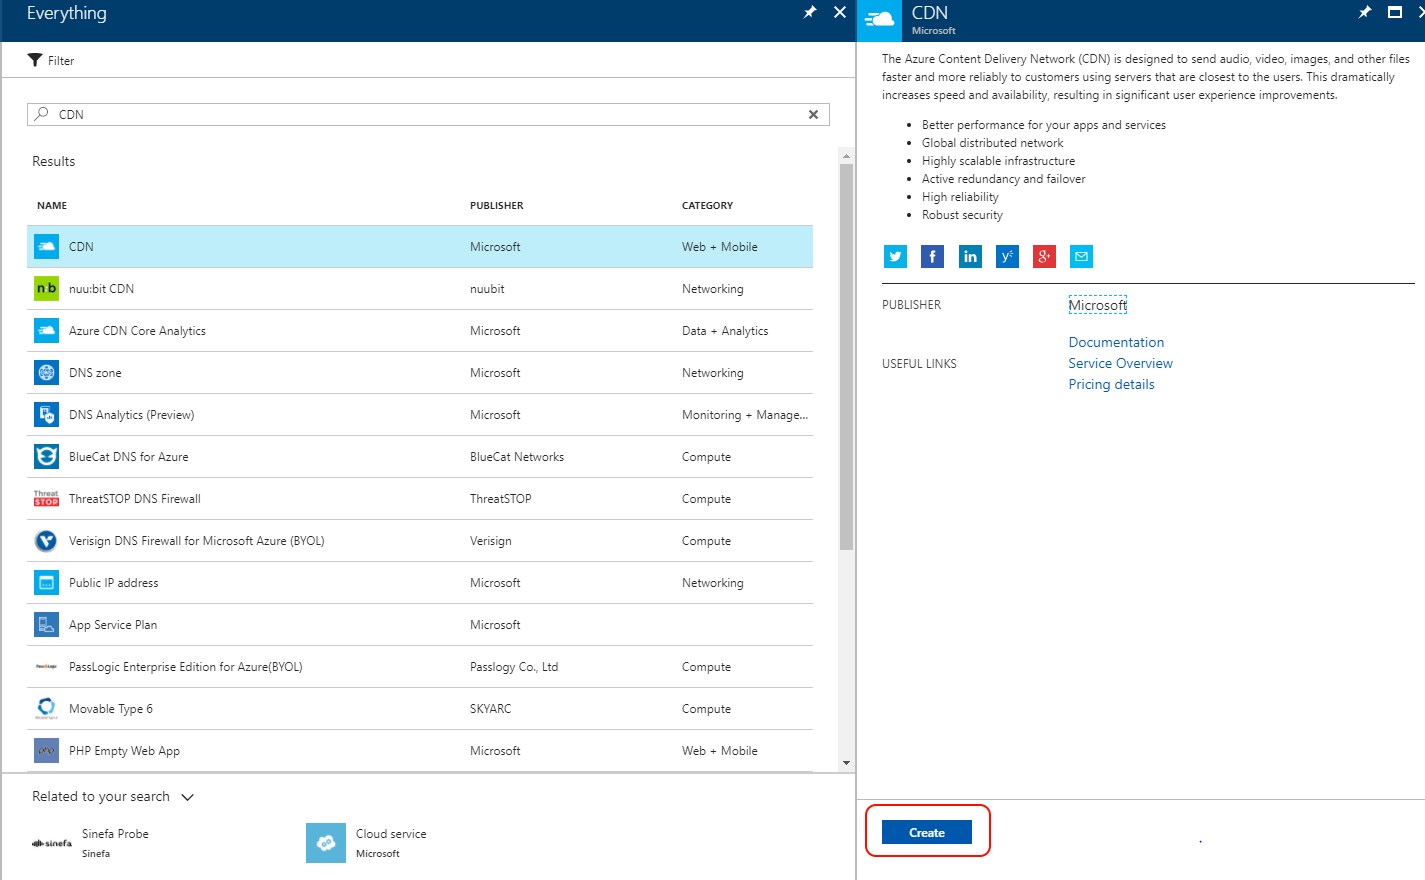
First things first, we must hop on over to the Azure Portal. I searched the marketplace for ‘CDN’ and clicked create in the right-hand pane, as shown:
The next phase involves configuring a CDN profile. The profile needs to be given a name and should be attached to an Azure Subscription. I’ve created a new Resource Group, by specifying a name for it, but it is possible to select an existing one for use here. There are some guidelines surrounding Resource Groups, such as items within a group should share the same lifecycle; more details can be found within this handy documentation article, read away!
The Azure CDN service is, of course, global but a Resource Group location must be set, which governs where resource metadata is ultimately stored. This could be an interesting facet to consider if there are particular compliance considerations regarding the storage of information and where it should be placed. I’m going with West Europe either way; a nice, easy choice this time around.
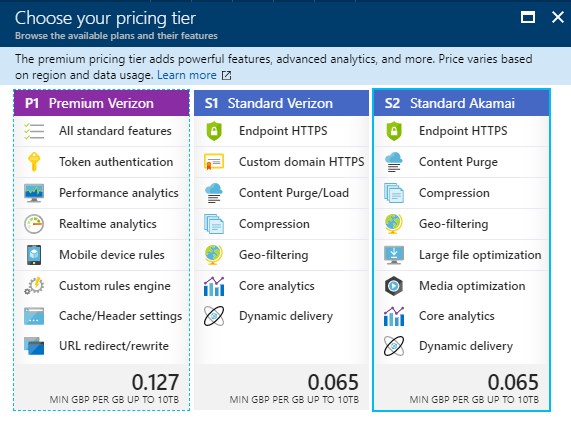
As for pricing, I have decided to head down the Akamai route, using the Standard Akamai pricing tier. I will have to see how this ultimately pans out cost wise over time, but it seems reasonable:
At this point, we can explicitly create a CDN endpoint (where resources will be ultimately exposed). The endpoint has a suffix of ‘.azureedge.net’ and I’ve simply specified the first part of our domain, ‘frogandpencil’ as the prefix.
This is where I hit a bit of a revelation with the ‘Origin Type’ drop down. You can select from Storage, Cloud service, Web app or Custom origin (which is cool!), of which I want to use Storage. After selecting this I can pick an ‘Origin hostname’. The light bulb moment here, for me, is that I should have created a storage container first! I’d watched enough videos to have dodged this little problem, but I still managed to stumble…all part of the learning process 😉
So… Let’s Create a Storage Container
Back to the market place then. The obvious pick seems to be ‘Storage account – blob, file, table, queue’, so I’ve gone ahead and clicked create here:

When creating the storage account there are a fair few options to consider, a good number that read as if they will impact pricing. I had to use the documentation found here to make choices. I settled on the setup described here (for images, and as the site isn’t yet using https, I’ve gone with the secure transfer feature being disabled – one for review in the future):
As an overview, the guidance suggests the use of the ‘Resource manager’ type of ‘Deployment model’ for new applications. There doesn’t seem to be a penalty for using the ‘StorageV2’ ‘Account kind’, which extends the types that can be stored outside of just blob data, so that is what I am going for.
Performance wise, the ‘standard’ option seems like an acceptable setting at the moment and for the kind of data I’ll be storing (images for now, and possibly other static content later down the line) I can opt out of any geo-redundant replication options. In the event of resource downtime, I can easily switch to the use of resources local to the website. Plus, there will not be any data being lost really, all easily rebuilt and recoverable.
As for the ‘Access tier’, I’m heading down the ‘Hot’ route as images will be accessed quite frequently (we have the CDN to consider here so I might tinker later on down the line).
I then pick a Subscription, give the Resource Group a name and select my region of choice before continuing.
I then get a new blade on the dashboard (which took a minute to create) and, on accessing, am presented with the following:

Managing the Storage Container
The first and perhaps most obvious choice for managing and actually getting some content up into the storage container is the Azure Storage Explorer, which I’ll be downloading and using.
After a painless install process, you should see the following, where you will be asked to connect to Azure Storage:

I simply used my Azure account sign in details here. I did notice however that the Azure Portal does expose, under ‘Access Keys’ (within the storage container dashboard), keys and connection strings. I’m assuming this is for other kinds of, including programmatic, access; which I’ll give a go I think as part of this post (as a wee bonus).
I used the right-click context menu to create a new container called ‘images’ and then used the upload button to push up a test image:

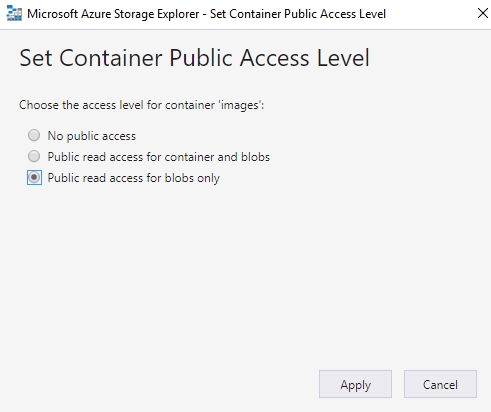
Again, against the container I used the right-click context menu to select ‘Set Public Access Level…’, which I’ve set as follows to allow public access to the blob data but not the container:
I now have a blob container with a single image in it with appropriate access rights configured. The question is can I access the image in its current state? We’re looking pretty good from what I can see.

Adding a custom domain
Next up, I plan on adding a custom domain to the storage account. To do this, I access the ‘Custom domain’ option as shown here:

I followed option 1 as listed here and created a CNAME record to map frogandpencilstorage.blob.core.windows.net to images.frogandpencil.com (I’m happy to wait for this to propagate).

Once the CNAME record is created you simply have to place your target URL in the text box provided and hit save.

Lastly, let’s take it for a spin and see whether we can access the image in the storage container via the custom URL…and voila:

Back to the CDN bit!
We’ve come full circle! With a storage container in place I can now use that to feed a configured CDN. Consequently, I backtracked and followed the previously listed steps being sure to select my ‘Origin hostname’ to point to the newly created storage container:

On clicking create it takes a short time for the CDN to be configured.
So, what do I do now
Looking through the videos I made another discovery. This is where I want to adjust the previously created CNAME property (that I setup for the storage container) and hook this up to the CDN endpoint instead. The portal exposes custom domain mapping for a CDN much like for a storage container:


Again, I had to wait a short time for the CNAME property change to propagate but, after that, I was all set. I then spent a little time verifying that the CDN was up and running. There are quite a few optimisation options including the ability to set a custom ‘Origin path’ (such as ‘images’) but I’m leaving these be for the time being.
The Bonus Section – Programmatically Add Items to Azure Storage
As promised, this next section discusses (in a very bare bones fashion) what is required to write to an Azure storage container. I’ve created a stub Console Application to get running with and the process itself is simple (not considering errors, existence checks and threading, of course!).
You need to:
- Reference the WindowsAzure.Storage NuGet package.
- Add a reference to System.Configuration (if you want to put connection strings, folder paths and container names in configuration files and read them out).
- Then simply follow the code outlined below to get started.
In my test setup, the ‘SourceDirectory’ is looking at ‘C:\test-files\’ (contains just images) and the ‘TargetContainer’ is called ‘images’, as per my earlier configuration. The connection string can be obtained from the Azure Portal, under ‘Storage Account > Settings > Access Keys’.


The App.config for the test application is structured like this, with the connection string being set to the correct value as per the information found in the Azure Portal.
<?xml version="1.0" encoding="utf-8" ?>
<configuration>
    <startup>
        <supportedRuntime version="v4.0" sku=".NETFramework,Version=v4.6.1" />
    </startup>
  <connectionStrings>
    <add name="FrogAndPencilStorageConnection" connectionString="[OBTAINED_FROM_THE_AZURE_PORTAL]" />
  </connectionStrings>
  <appSettings>
    <add key="SourceDirectory" value="C:\test-files\"/>
    <add key="TargetContainer" value="images"/>
  </appSettings>
</configuration>
Then, finally, the actual test code which…
- Attempts to connect to the storage container creating a CloudStorageAccount object, based on the connection string information supplied.
- Then uses the CloudStorageAccount object to get create a new CloudBlobContainer object (based on the container name stored in the configuration settings).
- Finally, utilise this CloudBlobContainer, along with information about the files to process, to actually perform the upload.
using Microsoft.WindowsAzure.Storage;
using Microsoft.WindowsAzure.Storage.Blob;
using System;
using System.Collections.Generic;
using System.Configuration;
using System.IO;
using System.Linq;

namespace WriteToAzureStorageTestApp
{
    /// <summary>
    /// Test application for writing to Azure Storage.
    /// Basic, test code only (throwaway code).
    /// </summary>
    internal class Program
    {
        #region Main (Entry Point) Method

        /// <summary>
        /// Main entry point method for this console application.
        /// </summary>
        /// <param name="args">Optional input arguments.</param>
        private static void Main(string[] args)
        {
            DemoWritingToAzureStorage();
        }

        #endregion Main (Entry Point) Method

        #region Private Static Methods

        /// <summary>
        /// Private static demo method illustrating how to upload to Azure Storage.
        /// </summary>
        private static void DemoWritingToAzureStorage()
        {
            // First use the FrogAndPencilStorageConnection connection string (for Azure Storage) to obtain a CloudStorageAccount, if possible
            CloudStorageAccount.TryParse(ConfigurationManager.ConnectionStrings["FrogAndPencilStorageConnection"].ConnectionString, out CloudStorageAccount storageAccount);
            if (storageAccount != null)
            {
                // We have a CloudStorageAccount...proceed to grab a CloudBlobContainer and attempt to upload any files found in the 'SourceDirectory' to Azure Storage
                Console.WriteLine("Obtaining CloudBlobContainer.");

                CloudBlobContainer container = GetCloudBlobContainer(storageAccount);

                Console.WriteLine("Container resolved.");

                Console.WriteLine("Obtaining files to process.");

                List<string> filesToProcess = Directory.GetFiles(ConfigurationManager.AppSettings["SourceDirectory"]).ToList();

                UploadFilesToStorage(container, filesToProcess);
            }

            Console.WriteLine("Processing complete. Press any key to exit...");
            Console.ReadLine();
        }

        /// <summary>
        /// Private static utility method that obtains a CloudBlobContainer
        /// using the container name stored in app settings.
        /// </summary>
        /// <param name="storageAccount">The cloud storage account to retrieve a container based on.</param>
        /// <returns>A fully instantiated CloudBlobContainer, based on the TargetContainer app setting.</returns>
        private static CloudBlobContainer GetCloudBlobContainer(CloudStorageAccount storageAccount)
        {
            CloudBlobClient blobClient = storageAccount.CreateCloudBlobClient();

            return blobClient.GetContainerReference(ConfigurationManager.AppSettings["TargetContainer"]);
        }

        /// <summary>
        /// Private static utility method that, using a CloudBlobContainer, uploads the
        /// files passed in to Azure Storage.
        /// </summary>
        /// <param name="container">A reference to the container to upload to.</param>
        /// <param name="filesToProcess">The files to upload to the container.</param>
        private static void UploadFilesToStorage(CloudBlobContainer container, List<string> filesToProcess)
        {
            // Process each file, uploading it to storage and deleting the local file reference as we go
            filesToProcess.ForEach(filePath =>
            {
                Console.WriteLine($"Processing and uploading file from path '{ filePath } (then deleting)'.");

                // Upload the file based on name (note - there is no existence check or guarantee of uniqueness - production code would need this)
                container.GetBlockBlobReference(Path.GetFileName(filePath)).UploadFromFile(filePath);

                RemoveFileFromLocalDirectory(filePath);
            });
        }

        /// <summary>
        /// Private static utility method for deleting a file.
        /// </summary>
        /// <param name="filePath">The file path (full) to delete based upon.</param>
        private static void RemoveFileFromLocalDirectory(string filePath)
        {
            // Only attempt the delete if the file exists
            if (File.Exists(filePath))
            {
                File.Delete(filePath);
            }
        }

        #endregion Private Static Methods
    }
}


There you have it; a rather around the houses and off the wall tour of setting up an Azure storage container and then linking this to an Azure CDN. Plenty of images still need to be brought over into the new storage container (and a few code changes to boot), but I feel like I am on a pilgrimage to a better place. I hope this proves useful nonetheless and, until the next time, happy coding!
Addendum
After a further play I realised that the C# example I’d knocked up was not setting the content type correctly on upload, as follows:

To this end, I adjusted the UploadFilesToStorage method to set the content type on a CloudBlockBlob before the upload is triggered, as illustrated here:
/// <summary>
/// Private static utility method that, using a CloudBlobContainer, uploads the
/// files passed in to Azure Storage.
/// </summary>
/// <param name="container">A reference to the container to upload to.</param>
/// <param name="filesToProcess">The files to upload to the container.</param>
private static void UploadFilesToStorage(CloudBlobContainer container, List<string> filesToProcess)
{
	CloudBlockBlob blockBlob;

	// Process each file, uploading it to storage and deleting the local file reference as we go
	filesToProcess.ForEach(filePath =>
	{
		Console.WriteLine($"Processing and uploading file from path '{ filePath } (then deleting)'.");

		// Upload the file based on name (note - there is no existence check or guarantee of uniqueness - production code would need this)
		blockBlob = container.GetBlockBlobReference(Path.GetFileName(filePath));

		// Correctly configure the content type before uploading
		blockBlob.Properties.ContentType = "image/jpg";

		blockBlob.UploadFromFile(filePath);

		RemoveFileFromLocalDirectory(filePath);
	});
}
You should then see items with the correct content type in the container:

To access images via the custom domain, essentially my CDN, I had to ‘purge’ it also at this point.
Again, happy coding.
