Cramming the word ‘sexy’ into the title was a sure-fire way of drumming up some attention. I’m happy to resort to dirty tactics as I’m still rocking my noob colours :-). It’s time to take a trip down the yellow brick, urm, jQuery road? Yes, I’ve said it now, so I’m sticking with it. I’ll start this in the way I mean to continue; with all of you wondering whether I’m mentally stable…..moving on!
I’ve been having a tonne of fun with this awesome JavaScript library. So much so, I think I’ve probably been driving all of my work colleagues a little bit nuts talking about it. I’m really not winning many friends here I’m sure but jQuery is, urm, just a little bit sexy dare I say it (sorry Claire, I’m sure I’ll pay for this later!).
I’m positive that I won’t need to tell too many people what this funky little API is all about, most developer buddies I have spoken to know of it, or are well versed (much more me than) in the wonders of what this has to offer.
jQuery allows you to perform HTML manipulation and traversing of the DOM (using CSS class selectors) as well as orchestrating some neat animation tricks.
I’ll aim to cover this API in further detail but I wanted to do a little ‘bear’ bones post to get this started (sorry, I couldn’t help it, bad joke I know!).
You’ve got a couple of choices on how to bring jQuery into scope; you can use a CDN (Content Distribution Network) or simply reference it from a known directory path. This can be done by dropping one of the following into the head element of the web page:
<!--Using the jQuery CDN (and using a designated version)-->
<script type="text/javascript" src="//ajax.googleapis.com/ajax/libs/jquery/1.11.1/jquery.min.js"></script>

<!--Using the Google CDN (and using a designated version)-->
<script type="text/javascript" src="//ajax.googleapis.com/ajax/libs/jquery/1.11.1/jquery.min.js"></script>

<!--Using a downloaded version of the file (stored within the _js directory of the website in this case)-->
<script type="text/javascript" src="_js/jquery-1.11.1.min.js"></script>
I’ll dodge the downloaded file vs CDN debate for now and just concentrate on jQuery’s usage, mainly due to the fact that I get the impression this incites violence among normally civilised folk.
For the purposes of a quick showcase I’ll utilise the jQuery ready function (as we’re going to be manipulating loaded HTML I want to make sure that this process is fully completed before the tinkering begins – Placing code in this function removes the possibility of us attempting to reference unloaded parts of the page).
Immediately beneath the script tag created to bring jQuery into scope bang in the following code:
<!--Add the long-hand ready function declaration to perform actions once the page HTML is loaded-->
<script type="text/javascript">
	//Long hand ready function declaration
	$(document).ready(function () {
		//Code goes here, for instance...
		console.log("Hello world! In the ready function!");
	});
</script>
I’ve decided though, with barely a second thought for the poor long-handed approach, to adopt the short-hand declaration myself:
<script type="text/javascript">
	//Short hand ready function declaration
	$(function () {
		//Code goes here, for instance...
		console.log("Hello world! In the ready function!");
 	});
</script>
You’ve got some choices in regards to how you want to target your code on the various elements found on a given web page. In general, at least for me so far in a very basic sense, I’ve been targeting elements by id, class and the actual tag type (element type) as follows:
<script type="text/javascript">
	//Short hand ready function declaration
	$(function ()
	{
		console.log("Start of ready...");

		//Get access to a DOM element (pure JavaScript) using traditional means. You'll only have access to normal JavaScript members
		var headerContainer = document.getElementById("HeaderContainer");
		console.log(headerContainer.innerHTML);         //Getting container html

		//Retrieve a 'jQuery Object' based on 'id'. You'll get access to jQuery specific members this way (equals awesome). Notice the use of hash in this scenario
		var $headerDiv = $("#HeaderContainer");
		console.log($headerDiv.html());                 //Getting container html

		//Retrieve a 'jQuery Object' based on CSS Class (representing all objects using that class). Notice the use of a period before the class name
		var $specialParagraph = $(".SpecialParagraph");
		console.log($specialParagraph.text());          //Getting element content

		//Retrieve a 'jQuery Object' by tag type (again, representing all objects using that element type). Just specify the element type using a string, no special prefix required
		var $h1Elements = $("h1");
		console.log($h1Elements.text());                //Getting element content

		console.log("End of ready...");
	});
</script>
Here, you can see that there are a couple of nuances when compared to selecting elements via pure JavaScript. The first is the use of the ‘$’ character, which is basically short-hand for specifying ‘jQuery(“selector”).function()’ – Essentially you’re using saying, “hey, I want to work with a jQuery Object please.”. Next up, you’re required to pop in a couple of parentheses and between these you provide a string specifying a ‘selector’, in turn denoting what kind of element/s you are trying to retrieve, and ultimately manipulate. Using an ‘id’ requires you to prefix the value with a ‘#’ and a CSS class requires a ‘.’ prefix. Grabbing elements by type doesn’t require a specific prefix at all so just place in the element you’re looking for and you are good to go.
In the examples above I have stored the DOM Objects and jQuery Objects in variables before operating on them. So far, I’ve been lead to believe that some developers prefix jQuery Object variables with a ‘$’ just to avoid any ambiguity in relation to any DOM Object variables sitting nearby, so I’ve followed this format. Anyone who stumbles along this with thoughts on whether this is correct please feel free to drop me a comment; I’d love to know how developers have decided to proceed in regards to variable naming conventions in production level code.
Just for simplicity, I’ve utilised the innerHTML property on the DOM Object and the .html() and .text() functions on the jQuery Objects (to get the selected elements HTML and text content respectively) and pushed these out to the console. The results of this can be seen below:

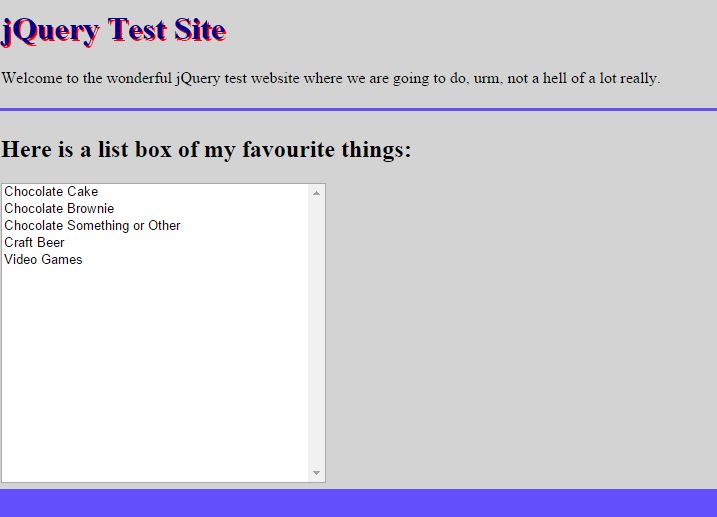
In order to have a little play around and provide a few simple illustrations of jQuery’s usage I’ve knocked up, what I’m sure you’ll agree, is some of the worlds greatest HTML markup (added to the pages body element) – Booyah:
<div id="HeaderContainer">
	<h1>jQuery Test Site</h1>
	<p>Welcome to the wonderful jQuery test website where we are going to do, urm, not a hell of a lot really.</p>
	<p class="SpecialParagraph">Only people who like craft beer see this paragraph.</p>
</div>
<div id="MainContainer">
	<h2>Here is a list box of my favourite things:</h2>
	<select id="GreatThingsListBox" multiple="multiple">
		<option>Chocolate Cake</option>
		<option>Chocolate Brownie</option>
		<option>Chocolate Something or Other</option>
		<option>Craft Beer</option>
		<option>Video Games</option>
	</select>
</div>
<div id="AnotherContainer">
	<button style="height: 35px; width: 75px" id="ClickMeButton">Click Me!</button>
</div>
So, I won’t be winning any awards for that! I’ve been staring at the colour palette of the test site whilst creating this post and I’m definitely starting to feel a tad nauseous; get the sick buckets at the ready :-).
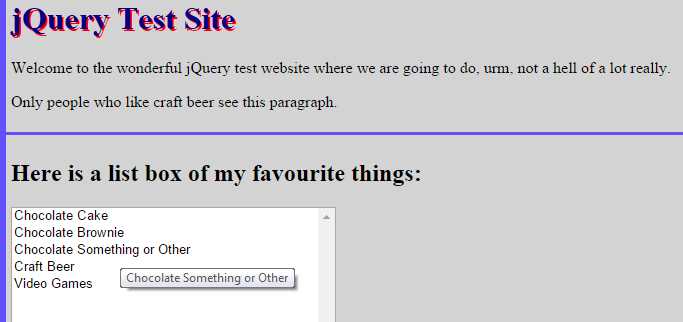
Firstly, lets take a look at a quick example that shows the simplicity of jQuery at work. The first code snippet shows my attempt at using JavaScript to retrieve all ‘option’ elements on the page. After retrieval, I do a loop through the found elements and call setAttribute to add a title attribute based on the text value of the option:
<script type="text/javascript">
	//Short hand ready function declaration
	$(function () {
		//Possible approach, using pure JavaScript, for adding title attributes to 'option' elements
		var greatThingsListBox = document.getElementsByTagName("option");

		for (var i = 0; i < greatThingsListBox.length; i++) {
			greatThingsListBox[i].setAttribute("title", greatThingsListBox[i].text);
		}
	});
</script>
Here’s the same thing using jQuery (using the .each() function to iterate over the found ‘option’ elements).
<script type="text/javascript">
	//Short hand ready function declaration
	$(function () {
		//Set the title attribute on every option element (based on the options value) - using jQuery
		$("option").each(function () {
			$(this).attr("title", $(this).text());
		});
	});
</script>
The .each() function can be passed a normal JavaScript function name (which will run for each item selected), but in this case I’ve used an anonymous function call. Within this function, and this is something that I really love, it’s a real cinch to get hold of the jQuery Object currently in scope using the ‘$(this)’ syntax (this is the current ‘option’ element). Not specifying the $(this) enables you to act on each element as a traditional DOM element if you want/need to. From a keystrokes perspective, and I think readability, we’re onto a winner.
This is the end result of the above jQuery code (my cursor is placed over the List Box item):
Looking at the page, you’ll notice that we have a very special paragraph implemented in the ‘HeaderContainer’ div. If you’re not a craft beer drinker like myself then I would really like to hide this element from view (p.s. beer comments/recommendations welcome to!). jQuery provides a very tidy and convenient way to accomplish this task via the use of the .hide() function.
Note: from this point forward I’ll be omitting the ready function declaration to simply emphasise the jQuery code snippets themselves:
//Hide the paragraph with the '.SpecialParagraph' CSS class
$(".SpecialParagraph").hide();
This removes the paragraph from view as show below:
A quick sniff around the DOM using your browser development tool of choice will indicate that jQuery has applied a style to the element in reaction to the .hide() function call (style=”display: none”). I think you’ll agree this is nice and simple, and with the power of using CSS selectors it’s quite easy to target a number of elements simultaneously. Also, for me, it’s just so darn readable; I’ve really found the syntax incredibly easy to pick up and play with. It’s clear to see that one of the core crowd pulling powers of jQuery is that it’s not all that intimidating and papers over some of the inherent complexities of JavaScript quite nicely. Put simply, it’s bonza!
Once you’ve brought a shiny jQuery Object into scope you are free to draw on a concept called ‘Function Chaining’ where multiple functions can be called on the object using a single statement. Syntactically and aesthetically, coming from a C# background with a serious love of LINQ and extension methods, this ticks all of the right boxes for me.
The code snippet below first hides our special paragraph (using the CSS class applied as the selector), then applies a small piece of custom CSS using a construct called an Object Literal (essentially, property/value pairs) and finally uses the .slideDown function to elegantly animate the paragraph into view, over the specified time frame:
//Retrieve a jQuery Object representing elements with the SpecialParagraph class and hide them on load (just the one is this case). But this time,
//use 'function chaining' and apply some custom css (or we could have called addClass to apply some kind of style) and animate the paragraph/s
//so they 'slide' down into view
$(".SpecialParagraph").hide().css(
	{
		"background-color": "black",
		"color": "red"
	}).slideDown(1500); //Slide down into view over 1.5 seconds

Hooking up to events is also a doddle. For example, to hook up a click event to a selected element/s you can call the .click() function and pass it an anonymous function or an existing raw JavaScript function that performs the required task, as below:
//Rig the ClickMeButton's (selected by id here) click event up (tied to an anonymous function in this case)
$("#ClickMeButton").click(function () {
	alert("Click me clicked. I could really do some complicated work now!");
});
//JavaScript function to handle the click
function respondToClick() {
	//complicated code goes here
	alert("Click me clicked. I could really do some complicated work now!");
}

//Short hand ready function declaration (included in this example to provide context)
$(function ()
{
	console.log("Start of ready...");

	$("#ClickMeButton").click(respondToClick); //Could just be a raw JavaScript function

	console.log("End of ready...");
});

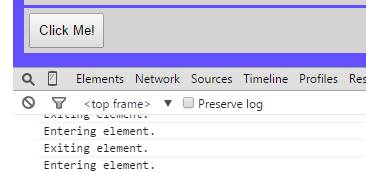
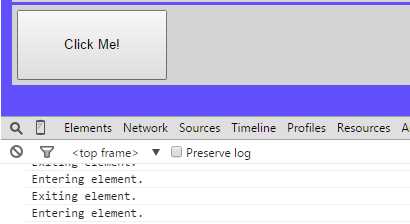
Moving further down this lovely yellow brick road, and this is something I’ve really enjoyed playing around with, it’s possible to call the jQuery .on() function to bind multiple events at the same time. As before, you can hook in raw JavaScript functions or anonymous functions, the latter seems to be the order of the day from what I’ve learnt so far (and rightly so, they are ace!). In the next code snippet I’m concurrently binding a click, mouse enter and mouse leave event to a button (again, selected by ‘id’) to build a slightly more interactive element (i.e. chopping and changing styles depending on whether the mouse is over the element):
//Simultaneously hook up the ClickMeButtons click, mouseenter and mouseleave events to various anonymous functions. 'On' comes in handy for 'event delegation'
//which I'll cover in a future post
$("#ClickMeButton").on(
	{
		"click": function () {
			console.log("click.");
			alert("Click me clicked. I could really do some complicated work now!");    //Handle a 'click'
		},
		"mouseenter": function () {
			console.log("AltStyle added.");
			$(this).addClass("AltStyle");                                               //Add the AltStyle to this element on 'mouseenter'
		},
		"mouseleave": function () {
			console.log("AltStyle removed.");
			$(this).removeClass("AltStyle");                                            //Remove the AltStyle from this element on 'mouseleave'
		}
	});

The on(). function has a very unique part to play in relation to the concept of Event Delegation, which I’ll cover fully in a later post. To serve as a very brief example, you may have an existing unordered list (ul) element on a web page, simply with no list items yet (li elements). The list items are dynamically created at some point after the page has loaded, perhaps on a button click for instance. In this scenario, if you wanted to tie a click event to each list item, you would have to do it on creation of each element (plus each item would require a separate handler which might not be all that yummy once the list becomes larger). This couldn’t be achieved on page load as the elements wouldn’t exist yet. With Event Delegation it is possible to palm off the click event to the parent unordered list element on load for any list items added later on to respond to, reducing stress levels and hair loss for the developer.
Rounding off the ‘cool’ factor of jQuery I wanted to show you an example of the hover function with a simple animation routine plugged in. I’ve rigged the code formatting a little to make this a little more readable. As I am used to C# formatting I still find the default placement of braces a little annoying from time to time when formatting via Visual Studio. Here’s the weird and wonderful snippet anyway:
//Utilise the hover function on the ClickMeButton that allows you to specify two anonymous functions (or tie in two existing javascript functions). The first one
//handles mouseenter and the second one handles mouseleave. In this example we are using .animate() to manipulate a buttons height/width. The jQuery UI API allows
//you to animate colour transitions and allows you to utilise some interesting 'easing' functions if you bring this into scope also
$("#ClickMeButton").hover
	(
		//Mouseenter
		function ()
		{
			console.log("Entering element.");

			//Make the button larger over half a second. Calling .Stop prevents animations from 'queuing' up
			$(this).stop().animate
				(
					{
						"height": "70px",
						"width": "150px"
					},
					500
				);
		},
		//Mouseleave
		function ()
		{
			console.log("Exiting element.");

			//Make the button smaller (set back to the original size) over half a second. Calling .Stop prevents animations from 'queuing' up
			$(this).stop().animate
				 (
					 {
						 "height": "35px",
						 "width": "75px"
					 },
					 500
				 );
		}
	);
The hover function is a compound function that enables the developer to simultaneously handle the mouse enter and mouse leave events in a single statement. I class this as simple syntactic sugar, but I love it all the same (give me lambdas and anonymous methods any day thank you!). This probably boils down to the fact that I’m easily pleased by the smaller things in life.
As the snippet above shows, the hover function is taking two separate anonymous functions as arguments. I’ve coded these functions to manipulate the elements height and width properties, using the .animate() function, to alter the values over a specified time frame.
jQuery UI, another branch off from jQuery, enables more complex animation effects to be kicked off (such as animating an elements colour properties). It’s certainly something to check out if you’re finding any of this interesting.
If you want an easy way to add, remove, copy and move HTML content on the fly easily then you’re really in luck here. There are a good number of functions built-in that will enable you to get your head down and deal with the task of handling changing HTML content dynamically. This next example illustrates one of the more basic functions, .append(), which enables you to specify a string of HTML content to place at the end of the selected element/s:
        //When theClickMeButton is clicked append HTML to the List Box (select element)
        $("#ClickMeButton").click(function () {
            //Add a new hard-coded option to the List Box (this would obviously be a much more dynamic example)
            $("#GreatThingsListBox").append("<option>Coding</option>");

            //Grab the last 'option' element on the page and set it's title attribute based on the text value (giving us a nice little tool tip)
            //You could do this by using: $("option").last().attr("title", $("option").last().text()); but storing the jQuery Object in a variable saves on processing (i.e the re-selection of the element)
            var $lastOptionOnPage = $("option").last();
            $lastOptionOnPage.attr("title", $lastOptionOnPage.text());
        });
This last snippet introduces the Event Object, which can be specified as a function parameter (which the engine is implicitly passing for use) and used within an anonymous function. This stores handy nuggets of information about the event that has been fired. In this case, I’m just pushing screen co-ordinates to the console to illustrate where a click occurred:
//Using the event object (any parameter name can be picked, I'm using 'evt') and pulling out the current screen co-ordinates on click
$(document).click(function (evt) {
	console.log("X Co-ord: " + evt.pageX + ", Y Co-ord: " + evt.pageY);
});

The post is nowhere near as short as I would have liked but I have developed a bit of a soft spot for jQuery so I’ve gone over the top. Why the hell not I guess, it’s free, reliable and heavily used and distributed under an MIT licence, what’s not to like! Whilst I’m on a ‘love rant’ I may as well mention that an extensive amount of Plug-Ins are available, adding to the fun in my opinion. It’s also incredibly easy to draw out hidden and selected elements using jQuery (i.e. from a set of check boxes, for example), so read up if you’re interested. I hope you’ve enjoyed the first, real, coding post. Enjoy, like, comment, subscribe, talk to me about craft beer and code, etc. Whatever takes your fancy.
I haven’t decided on my next topic yet but I’d like to get something out of the door by the end of the week, so watch this space. Cheers to Pete for the jQuery book you’ve loaned me and to Claire for reading through this (it would have been much messier without your intervention!).
DISCLAIMER: All of the code snippets were ruined seconds before posting by the proof reading tool so I had to mend them on the fly, with any luck I’ve caught all of the screw ups!
Useful links:
jQuery Website
jQuery API Reference Guide
The Missing Manual Series JavaScript and jQuery
Cheers all!
